Lately, I have been feeling blah. Not sick, not depressed, just...blah. I'm not sure if it's the lousy weather we've been having or just the stress of my husband's occasionally crippling but always constant headaches, or even the knowledge that this will be my first year hosting family for Christmas. My best guess is that is has something to do with my husband's new shifts at work and the fact that five nights a week now I have to fall asleep in an empty apartment and it just feels weird. You spend 2 1/2 years getting used to falling asleep with someone else in bed with you and then all of a sudden you have to try to fall asleep alone again. Oh well.
But lately I just haven't felt like cooking. To be honest, I haven't even felt much like eating. At least not anything that takes more than 5 minutes to prepare.
And my camera? Died the night I went to Morimoto's in Philadelphia for my 2nd wedding anniversary, so all I have are crappy, grainy cell phone pics. But that's a post for another day.
Today's post is about quick and easy, rich and creamy.
Work today was easy and boring, but I still didn't feel like cooking the two chicken thighs I had defrosted. No idea why. So I fell back to a staple that I eat a lot of on nights my husband works: pasta. It's easy to cook, and even easier to toss sauce onto. But tonight I just didn't feel like tomato sauce, especially the part about defrosting a whole bag of it for just myself. So I searched the fridge and was pleased to find a bit of heavy cream left over from some unremembered dish and lo and behold, it's still good til the end of the month!
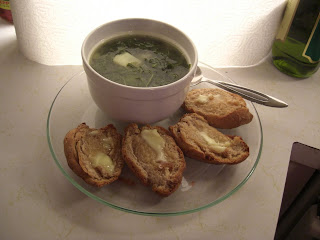
I know I have a half jar of basil pesto and some Parmesan cheese so I grab those as well as a clove of garlic and a small pat of butter.
When my 1/2 lb. of pasta was almost done cooking (I used mezze regate, which is basically the short bus of rigatoni, little rings of pasta with a ridged exterior) I grabbed the smallest saucepan I could and melted the butter over medium low. I added the clove of garlic, chopped, and sauteed for a minute, being careful not to brown the butter or the garlic. Then I added two small spoonfuls (a silverware teaspoon, not the accurately measured teaspoon kind) of pesto and stirred that til it bubbled. Next I added about a half cup of heavy cream and two spoonfuls of Parmesan cheese. I brought this to a boil and let it bubble away for maybe a minute or two while I drained my pasta thoroughly and put it into a bowl to be tossed with the sauce. I poured all the sauce over the pasta and tossed to coat, threw some of it into a bowl and dug in.
It was creamy, flavorful and delicious, and other than the time it took for the water to boil and the pasta to cook, it was done in 5 minutes! Did it need anything? Maybe a little bit of black pepper, but that's it! A quick and easy meal that was satisfying and fulfilling.
This dish would be delicious as a side dish along with a green salad and a juicy filet mignon.
Again, sorry for no pictures this post but my camera is currently charging and will hopefully be ready for the next post. See you soon!

Saturday, October 2, 2010
Saturday, September 18, 2010
Recipe Test #6: Vegetable Samosas

Thanks to one of my best friends from high school, Anisah, I have a love of Indian and Pakistani food that does not extend to the rest of my immediate family. I have very fond memories of going to her house after school and smelling the savory spices, meats and rice, and of trying my very first taste of goat biryani. In college, I was lucky to have a good friend who also loved the exotic flavors of the Asian Subcontinent, and we frequented a restaurant in Providence aptly named "India". There I learned to love the fiery hot Chicken Vindaloo. On a field trip to New York City I had the most delicious (and the hottest) Thai yellow curry. And during my month long trip to the UK, I fell in love with Chicken Tikka Masala.

But these days, married and back in New Jersey, I find I occasionally crave those flavors but have trouble finding someone to enjoy them with. One of the dishes I really missed but had not yet mastered were samosas: spicy vegetables wrapped in a packet of dough and deep fried to perfection (unless you get them on a buffet). So I decided to suck it up and make them, especially since Yom Kippur has granted me a 3 day weekend. So I scoured the interwebs for a recipe that was not overly complicated and could be made using ingredients I had mostly on hand. Luckily, I found one at http://www.samosa-recipe.com (which, at the time of this writing, seems to be down). I adapted the recipe they provided to my taste and to what I had on hand. So here it is, at long last, vegetarian samosas!
Vegetable Samosas
- · 2 medium potatoes, cut into 1/4 inch cubes.
- · 1 1/2 cups carrots, diced finely
- · 2 cloves garlic, minced
- · 1 onion, chopped finely
- · 1 cup of frozen mixed vegetables (peas, carrots, corn)
- · 1 TBSP ghee (or vegetable oil)
- · 3 TSBP curry powder
- · 1/4 TSP cayenne pepper
- · salt & pepper to taste
- · 1/3 cup water
- · 1/2 pkg. of phyllo pastry
- · Oil for frying
Heat the ghee or vegetable oil in a large sauté pan, add the onion and garlic, stir in the curry powder and the cayenne pepper and fry until softened. Add the potatoes, carrots, frozen vegetables, and salt and pepper to taste. Stir until well coated. Turn the heat to low, add the water and cover. Allow the mixture to cook for 30 minutes, until the potatoes are soft and the water has evaporated off. Turn off the heat, leave the cover on, and allow to cool, about 1 hour.
After the mixture has cooled, prepare your oil for frying. I used a medium sized saucepan and filled it about halfway, or about 4" up. Hey, I didn't measure okay? I also didn't use a thermometer. I tested the oil with a leftover piece of phyllo, dampened with a tiny bit of water. When it bubbled vigorously, the oil was hot enough.
 |
| http://lldzines.com/spanakopita/folded.htm |
Cut the phyllo pastry in half lengthwise. Take two or three sheets of phyllo, and put a heaping teaspoon of filling on one end. Fold the phyllo gently according to the above diagram, putting a little bit of water on the last little flap with your finger. Set aside until done the rest.
When all of your samosas are ready to go, drop them into the hot oil two or three at a time. Fry until a deep golden brown. Remove from oil and drain on paper towels. Enjoy immediately!

Results
These were definitely the crispiest, moistest samosas I've ever had. I might even say these were top 3 for the most flavorful too. The phyllo dough here was the kicker. After tasting deep fried phyllo dough I must find more items to stuff into this delicious pastry! The samosas were crispy and buttery on the outside, and on the inside the potatoes gave the savory filling an almost creamy texture. The first bite yielded a sweetness that was slowly replaced by curry flavor and finally a mild heat in the back of the throat.
Verdict
I ate five of them. Unfortunately I have to share them with my husband. =( (AKA they were pheNOMenal!)
Monday, September 13, 2010
Recipe Test #5 - Greek Nachos
My husband loves Greek food. He has fond memories of this little Greek takeout place down the street from the Dell call center where he used to work when he lived in Ottawa. It's called Athens Grill, and it's representative of all things Greek: blue and white decor, gyros, souvlaki and garlic. Lots and lots of garlic. Since going to this place was one of my first ventures into Greek cuisine, I assumed all Greek food was as garlicky as this food. Thank goodness I was wrong (and that I love garlic)!
Turns out, the chef at Athens Grill is Lebanese, and according to my husband, who grew up closely with a Lebanese family, the Lebanese use a lot more garlic than the Greeks. Either way, I do love garlic, and I love the fresh dips and sauces that go along with your typical Greek meal: hummus, tzatziki and skordalia. They always taste refreshing and I never feel guilty for eating them.
So the other day I was browsing through a bunch of my favorite food blogs and I came across this post. "WAT! Greek NACHOS?! No wai!!!" I said to myself, immediately bookmarking the recipe for future use. Now I love nachos. LOVE. I mean, who doesn't? They're crunchy, cheesy, meaty and just darn delicious. However, I rarely eat them because they are terribly unhealthy for you. But Greek Nachos... now there was a recipe designed with genius! I will admit, these nachos were a bit more work than your average tortilla chip with some melty cheese, but they were well worth it.

Greek Nachos
• Hummus (Recipe Below)
• Tzatziki (Recipe Below)
• 1 tomato, chopped fine
• 1 cup lettuce, shredded
• 1/4 cup feta cheese, crumbled
• 1 lb. ground beef
• 1 medium onion, minced
• 1 clove garlic, minced
• 1 tsp. dried oregano
• 1 tsp. cumin
• 1 tsp. olive oil
• 4 pita, cut into wedges
Preheat the oven to 375 degrees.
In a large sauté pan heated to medium-high, add the olive oil. Add onion and garlic, and cook for 3 minutes or until translucent. Add the cumin and oregano and cook one minute more to bring out the oils in the spices. Turn the heat to high and add the ground beef. Cook until browned nicely, stirring occasionally. Drain the meat in a colander, set aside.
Put the pita wedges on a large cookie sheet, spread out as best you can, and bake for approximately 10 minutes or until they are golden brown and crispy. You want the pita to be crisp all the way through like a tortilla chip, but not burned. If necessary, bake at a lower temperature for a longer time to dry them out. (The pita I bought at Shoprite were really thin, and crisped up perfectly. I imagine the thicker ones will be a bit harder when baked, and you might want fewer of them because they're more substantial.)
Place a handful of the baked pita chips on a place, top with meat, hummus, tzatziki, feta, tomato and lettuce and DIG IN!
Hummus
Over the last few years, hummus has been steadily rising on the food scene as a delicious alternative to higher fat, low nutrition dips. Made from chickpeas, hummus is an excellent source of protein, and, if made at home, can be low-sodium and a source of good fats. If you choose not to make your own hummus (and I understand, it's a lot of prep), just buy a tub from your supermarket and thin some of it out with some water or olive oil to make it dollop-able. Making it at home does require some special equipment: a food processor or a really good blender.
• 1/2 lb. dried chickpeas
• 1/2 tbsp. tahini*
• salt to taste
• juice of 1 lemon
• 1 clove garlic
• good quality extra virgin olive oil
Cook the chickpeas according to package directions. (I did mine the easy way and tossed them into my small crock pot, adding water to the top, and putting them on high overnight. No salt, no seasonings, no nothing, just water and chickpeas.) Drain them, reserving the cooking liquid. Allow them to cook to room temperature.
Put the cooled chickpeas, garlic and tahini into your food processor and pulse a few times to make sure the garlic is chopped up. Then add in the lemon juice and about a quarter cup of the cooking liquid. Turn the processor on, and blend until smooth, adding a few tablespoons of extra virgin olive oil (this part is to taste). If it is too thick, add cooking liquid until it is the consistency you want. At this point, taste it. Does it need salt? Probably. Add salt to taste, and blend a few more moments for a nice, smooth consistency. Refrigerate if you aren't going to use it right away. Leftovers can be consumed with any raw veggie or toasted pita, or used instead of mayo on a sandwich.
Tzatziki
If you've ever eaten a gyro, souvlaki or falafel, you've probably had tzatziki. It always contains at least four ingredients: yogurt, cucumber, garlic and an herb. I like mine with dill, though some recipes call for mint and/or parsley. Some recipes call for tahini. This is my own personal version, and one I would put on my breakfast cereal if that were the thing to do.
• 2 cups plain low fat yogurt
• 1/2 tbsp. tahini*
• 1 clove garlic
• 2 tbsp. fresh dill
• 1 cucumber
• 1/4 tsp. sea salt
This is a recipe you'll want to start the night before. Line a small colander with several layers of cheesecloth or two coffee filters (I use coffee filters, cheesecloth is expensive!). Scoop in the yogurt and set the colander over a bowl to catch the whey. Place this in your fridge, uncovered, for at least 4 hours, preferably overnight. The whey will drain out of the yogurt, making it thick, somewhere between cream cheese and full-fat sour cream.
The next day, cut the ends off of the cucumber, peel it, slice it in half lengthwise, and scoop out the seeds. Using a box grater or your food processor, grate the cucumber. Put the cucumber shreds in a colander, add the sea salt and toss. Put this colander over a bowl like you did with your yogurt, and allow that to sit in your fridge while you go take a nap, do some laundry, or catch a movie (four hours is good).
When you're done all your leisurely activities, squeeze the cucumber shreds to get all of the excess moisture out. Trust me, you'll thank me later.
Mince the garlic fine and do the same with the dill. You can do these at the same time if you wish.
Now comes the easy part: stir everything together. Yep, that's it. Stir the yogurt, cucumber, garlic, dill and tahini together and you're done! My suggestion would be to let this meld flavors for a while in the fridge, but if you're really in a hurry it's ready to eat right away.
* Tahini is a paste made from sesame seeds. You can find it near the peanut butter at your grocery store. The brand I use has an orange and brown can. You will find that after a period of non-use, the paste will separate into the protein and the oil, but if you stir it back together it's as good as new. I have read it lasts forever, so don't worry about it going bad if you don't use it right away. If you don't want to buy a can because of price, or if you've run out, like I did, you can use a couple of tablespoons of sesame seeds smashed in a mortar and pestle with a teaspoon of olive oil. Worked fine for me.

Results
YUM! I score these puppies a 10/10, and my hubby says, and I quote: "they are at LEAST an 8". This coming from the man who was almost done his plate before I had even finish photographing mine, and delved into seconds with no hesitation. The pita chips with the perfect vehicle for the tasty, garlicky sauces and savory ground beef. The lettuce and tomatoes added some crisp freshness and the feta a salty bite. I could probably eat these once a week.
Verdict
Three words: WIN WIN WIN. That is all.
Saturday, September 11, 2010
A Taste of the Azores: Caldo Verde
Simplicity.
Sometimes when you come home from a long day at work and the air has the slightest chill that signals the coming autumn all you want is a bowl of warm, salty broth studded with bits of soft potato and speckles of deep green kale and a nice crusty roll to dip into it.
Last Saturday as I left work and turned to the right to head to my car, the breeze was cool and I knew that Autumn was rolling out of his bed after a too-long nap, groggy and restless from Summer's wild parties that kept him from sleeping soundly. It was the perfect day for Caldo Verde, a traditional Portuguese soup I fell in love with around the same time I was falling for my husband, Paulo.
This is my husband's favorite soup. You can make it from start to finish in about 45 minutes.

Caldo Verde or Portuguese Kale Soup, Azorean Style
In a big stock pot sauté the onions over medium high heat until translucent, add garlic and cook 3 minutes more.
Add in the water and bouillon or the chicken stock, the cut up potatoes and the kale, bring to a boil, then turn down to a simmer.
Cook for 30 minutes, or until the potatoes are falling apart tender. Take the back of the spoon and crush the chunks of potato against the side of the pot to break them up. This makes the broth a bit thicker and it makes it easier to spoon since you don't have the huge potato pieces.
We enjoy this with some nice crusty bread and butter!
PS: I found my camera, so from now on all recipes will have mediocre photos to go along with them! =)
Sometimes when you come home from a long day at work and the air has the slightest chill that signals the coming autumn all you want is a bowl of warm, salty broth studded with bits of soft potato and speckles of deep green kale and a nice crusty roll to dip into it.
Last Saturday as I left work and turned to the right to head to my car, the breeze was cool and I knew that Autumn was rolling out of his bed after a too-long nap, groggy and restless from Summer's wild parties that kept him from sleeping soundly. It was the perfect day for Caldo Verde, a traditional Portuguese soup I fell in love with around the same time I was falling for my husband, Paulo.
This is my husband's favorite soup. You can make it from start to finish in about 45 minutes.

Caldo Verde or Portuguese Kale Soup, Azorean Style
- 1 bunch kale, stems removed and torn into bite sized pieces
- 4 medium sized potatoes, peeled and cut into 2 inch pieces
- 10 cups of chicken stock or 10 cups of water plus bouillon (I always use bouillon)
- 1 onion, sliced thin
- 1 clove of garlic, minced
- 2 tbsp olive oil
In a big stock pot sauté the onions over medium high heat until translucent, add garlic and cook 3 minutes more.
Add in the water and bouillon or the chicken stock, the cut up potatoes and the kale, bring to a boil, then turn down to a simmer.
Cook for 30 minutes, or until the potatoes are falling apart tender. Take the back of the spoon and crush the chunks of potato against the side of the pot to break them up. This makes the broth a bit thicker and it makes it easier to spoon since you don't have the huge potato pieces.
We enjoy this with some nice crusty bread and butter!

PS: I found my camera, so from now on all recipes will have mediocre photos to go along with them! =)
Friday, September 3, 2010
Recipe Test #'s 3 & 4: Southern Fried Catfish and Hushpuppies
It has been forever since I'd had fried catfish. Years even. In fact, I don't think I was out of high school the last time I had it. So when I saw the fillets taunting me from the fish case, I caved. I decided to make fried catfish and hush puppies for Friday night's dinner (even though we are months and months away from Lent).
Growing up, I ate seafood only rarely, because my father thought he hated it. In fact, it wasn't until I was 12 or 13 years old that he discovered how delicious fried shrimp were. (Now he loves shrimp, crabs, scallops, salmon, tilapia and steelhead trout.) Therefore, fish has never really been something I was accustomed to.
Don't get me wrong: I adore shellfish. I could eat nothing for a meal but a bowl of shrimp boiled in Old Bay and be happy. I will happily chow down on clams, oysters, scallops, crabs, mussels, octopus, squid and lobster. Yet fish... fish has always intimidated me.
Perhaps it's the worry of overcooking it, or not cooking it enough, or figuring out how to flavor it without masking the subtle flavors. Who knows?
My favorite fish to cook is cod. In my opinion, all you need for a delicious and flaky piece of cod is some butter, salt and pepper, and a few lemon slices. Easy as pie. So when I was figuring out what to do with the catfish I decided to do it the only way I had ever eaten it: fried. I came across the following recipe by Mama Smith at AllRecipes.com.
Southern Fried Catfish
By: Mama Smith
Ingredients
• 1/2 cup buttermilk
• 1/2 cup water
• salt and pepper, to taste
• 1 pound catfish fillets, cut in strips
• 1 1/2 cups fine cornmeal
• 1/2 cup all-purpose flour
• 1 teaspoon seafood seasoning, such as Old Bay™
• 1 quart vegetable oil for deep frying
Directions
1. In a small bowl, mix buttermilk, water, salt, and pepper. Pour mixture into a flat pan large enough to hold the fillets. Spread fish in one layer over bottom of pan, turning to coat each side, and set aside to marinate. (The recipe didn't say how long to "marinate" the fish. I let it sit in the buttermilk mixture for about 10 minutes while I prepared the rest of the meal.)
2. In a 2 gallon re-sealable plastic bag, combine the cornmeal, flour, and seafood seasoning. Add fish to mixture, a few fillets at a time, and tumble gently to coat evenly. (I always read the negative reviews of recipes first at AllRecipes.com. There were a couple of people that mentioned the breading fell off after they stuck the fish in the oil, so I let my fish rest for 10 minutes with the coating on so it could set, and not a drop fell off in the oil.)
3. Heat oil in deep fryer to 365 degrees F (185 degrees C). Allow me to butt in for one moment: I am lazy and I hate to deep fry anything. I pan fried these in about 3/4 inch of oil in my largest saute pan until dark golden brown and then flipped them, cooking them on the other side until dark golden brown).
4. Deep fry fillets until golden brown, about 3 minutes. Avoid overcrowding so fillets have room to brown properly. Fish should be slightly crisp outside, and moist and flaky inside. Drain on paper towels.
Along with the fish I figured since I had to buy a quart of buttermilk for 1/2 a friggin' cup, I might as well make buttermilk hush puppies too. For that recipe I went straight to the source of all things delicious and artery-clogging: Paula friggin' Deen.
Hushpuppies
Recipe courtesy Paula Deen
Ingredients
• 6 cups peanut oil
• 1 1/2 cups self-rising cornmeal
• 1/2 cup self-rising flour
• 1/2 teaspoon baking soda
• 1/2 teaspoon salt
• 1 small onion, chopped (I used 2 tsp onion powder because I'm LAZY)
• 1 cup buttermilk
• 1 egg, lightly beaten
Directions
Using a deep pot, preheat oil for frying to 350 degrees F. Butting in here again: screw this, I pan fried them and flipped them halfway through.
Using a mixing bowl, stir together the cornmeal, flour, baking soda, and salt. Stir in the onion (or onion powder if you're lazy like me). In a small bowl, stir together the buttermilk and egg. Pour the buttermilk mixture into the dry ingredients and mix until blended. Drop the batter, 1 teaspoon at a time, into the oil. Dip the spoon in a glass of water after each hushpuppy is dropped in the oil. Fry until golden brown, turning the hushpuppies during the cooking process.
Results
Both of these recipes were incredibly easy to make, and the entire meal took me maybe a half hour total from start to finish.
The fish, while audibly crunchy and moist on the inside (and as hot as molten lava), was bland. And my husband Paulo didn't like the Old Bay Seasoning flavor. Even with the Old Bay, the fish needed salt, or, I should say, the breading needed salt. I bet mixing in taco seasoning would have made the fish lip-smackingly good. It just needed something more, you know?
The hush puppies, however, we both adored. Super crunchy on the outside, but moist and cakey on the inside, with a mild oniony flavor from the onion powder. The only thing I think they really needed was to perhaps be studded with some whole corn kernels for that really corny flavor. So the hush puppy recipe is definitely a keeper!
Verdict
I'm ditching the catfish recipe in exchange for something more flavorful. While not bad, it didn't really *do* anything for me. The hushpuppy recipe however, went into the "Recipes I Love" bookmark folder!
Wednesday, September 1, 2010
Recipe Test #2 - Crunchy Pork Chops with Garlicky Spinach and Tomato Salad
WE INTERUPT THIS BLOG FOR A PICKY EATERS WARNING: If you do not like the taste of raw garlic, you will not enjoy this dish. However, if like me you love the taste of raw garlic, then this is the dish for you! We now take you back to your regularly scheduled programming.
Since my husband Paulo started his new job in March, I've been planning meals for the week with the idea of having leftovers for lunch the following day. Sometimes this works out, and sometimes it doesn't (see previous entry for things not working out). Fortunately for me, however, he currently has Thursdays and Fridays off, so on those nights we can go out to eat or I can make smaller portions. That's where this recipe comes in.
You would think I would have been scared off of Nigella Lawson due to the ultimate failure of the last recipe I cooked of hers. (You'd be wrong, I still adore her!) This recipe, however, requires very little tweaking to make it healthy, as it pretty much already is healthy, excepting for drying the chops in oil, which I am willing to cope with. =)
In fact, the only tweaking at all I did to this recipe was to leave out any extra salt in the pork chop coating, because both the mustard and the parmesan cheese added the bit of saltiness it needed.
Without further ado, the recipe:
Crunchy Pork Chops with Garlicky Spinach and Tomato Salad
Adapted from Nigella Lawson
Ingredients
PORK CHOPS:
• 2 pork chops, approximately 8 ounces each
• 1 egg
• 1/2 teaspoon Dijon mustard
• 1/4 teaspoon dried oregano
• Freshly ground black pepper
• 1 cup bread crumbs (I used Panko)
• 1 tablespoon freshly grated Parmesan
• 1 cup ground nut oil or similar, for frying (I used peanut oil)
GARLICKY SPINACH AND TOMATO SALAD:
• 3 medium tomatoes
• 1/2 clove garlic, minced (I grated it on a fine grater, watch your fingers!)
• 1 tablespoon olive oil
• 1 tablespoon lemon juice
• 4 cups baby spinach leaves (I took extra precaution and washed them in my salad spinner)
• Salt and pepper
Directions
Trim the thick white fat off the pork chops, cutting carefully around the outside edge. Lay the chops between 2 pieces of plastic wrap and, using a mallet or a rolling pin beat them until the meaty part of the chop is half as thick. You will need to beat around the bone, so turn them over once as you go.
Beat the egg in a shallow wide bowl with the mustard, oregano, and salt and pepper. On a large plate or platter, combine the breadcrumbs with the Parmesan.
Press each of the chops into the egg mixture, coating either side. Then dip the eggy chops into the bread crumbs, covering them evenly. Let them lie on a cooling rack to dry slightly while you heat the oil in a large frying pan. When a small cube of bread sizzles if dropped into the oil, then the oil is hot enough. Cook the chops until they are a deep golden color, about 5 to 7 minutes a side (depending on how thin you've managed to get them and how cold they were before going in the oil).
Meanwhile, quarter the tomatoes and take out the seeds, then cut the shells into strips and dice them. (Let me butt in here. I am way too lazy to remove all the seeds and finely dice the tomato. I cut each tomato into 8 wedges, then cut each wedge in half crosswise, and squeezed them slightly to get some of the moisture and seeds out. Just a gentle squeeze will do, it worked for me!) Combine the diced tomato, minced or grated garlic, oil, and lemon juice in a bowl, and season well with salt and pepper.
When the chops are ready, toss the spinach in the tomato mixture until well coated and divide the salad between 2 large plates, putting each chop alongside.
Results
Oh my gosh was this recipe easy to make. From start to finish I think it took me maybe 15 minutes of prep and cooking combined: a perfect after-work meal. Plus the taste? Yum! Even my semi-picky husband Paulo loved it! Not only was the pork super crispy and perfectly seasoned, the salad was really refreshing, with the acidity of the lemon juice cutting through the heaviness of the pork chops. Now I served the salad on the side, but in future cases I think I'm just going to dump the salad right on top of the chop. I ate it all together anyway, and I really enjoyed how the salad lightened the chop and how the chop added crunchiness to the salad.
Would I change anything? I don't think so. If I had to criticize it at all, I would say maybe there should have been a tiny bit more oregano. Or, better yet, I would sprinkle the oregano on between the egg wash and the breadcrumbs. A lot of it got lost when it was mixed into the breadcrumbs.
Now I ate this meal with a delicious Coca-Cola Classic, my drink of choice, but if I were to choose something alcoholic, I think this dish would be amazing with a nice White Sangria.
Verdict
I will definitely be making this again at least once before the summer is over. It definitely would have benefitted from garden fresh tomatoes instead of the still-good-but-not-amazing ones I got from Shoprite, but if you use really good produce this dish can really shine.
Up Next: Tomorrow night we are having oh so delicious pizza with my parents, so no post tomorrow, but I'll be back on Friday. Most likely fried catfish and hushpuppies. Stay tuned!
Tuesday, August 31, 2010
Exotic Ingredient: Soba
I love soba noodles, and I'm not ashamed to admit it!
*gulp* *quick glance around*
Nope, not ashamed.
While soba is every day food in Japan, it is much more rare here. I can sometimes find soba noodles at my local ShopRite, but more often than not, I just head to the Asian Market in Cherry Hill, NJ. The noodles there are better quality and far less expensive. If you have trouble reading labels in foreign languages, just keep your eyes peeled for squared noodles with a darker, brownish gray color. They're usually about 8 inches long, and pre-bundled in serving size for convenience.
Soba noodles are a type of Japanese noodle made from buckwheat flour as opposed to regular wheat flour. The buckwheat flour gives the noodles a brownish gray color when raw, and a soft yet subtly chewy texture when cooked. Unlike regular wheat flour noodles, soba has a slightly sweet flavor that is not masked by stronger flavors.
Soba can be served chilled or hot, and is especially good when tossed in a peanut or teriyaki sauce. Cold soba salad is often served with sesame flavored sauces, which really allow the flavor of the noodle to stand out.
Teriyaki Chicken Thighs w/ Soba Noodles
Adapted from Ellie Krieger
Ingredients
- 1/4 cup low-sodium soy sauce
- 2 tablespoons brown sugar
- 2 tablespoons dry sherry
- 2 tablespoons rice vinegar
- 2 garlic cloves, crushed with a garlic press or minced
- 1 teaspoon finely grated fresh ginger
- 2 pounds skinless chicken thighs
- 2 teaspoons sesame seeds
- Enough soba noodles for six people
Directions
Combine the soy sauce, sugar, sherry, vinegar, garlic, ginger and red pepper flakes and stir until the sugar dissolves. Transfer to a resealable plastic bag and add the chicken. Seal the bag and marinate the chicken in the refrigerator, turning once, for 1 hour. The chicken can be marinated for up to 4 hours.
Meanwhile, cook soba as per directions on the package. Heat the broiler to high. Arrange the chicken on a broiler pan skin side down and broil until brown and crispy, 8 to 10 minutes. Flip the chicken and broil until almost cooked through, about 8 minutes longer. Sprinkle with sesame seeds and cook until the seeds turn golden brown and the chicken is done, 1 to 2 minutes longer.
While the chicken is cooking, pour the marinade into a small pan and bring to a boil. Boil for 2 minutes to make sure all the raw chicken juices are cooked. Then toss the soba noodles with enough of this sauce to coat and enjoy!
Subscribe to:
Posts (Atom)